Live streams have become the cornerstone of digital file transmission over the internet. With a strong streaming encoder, you can virtually showcase any of your visual and audio content to viewers halfway across the world without any complications.
What is a Live Streaming Encoder?
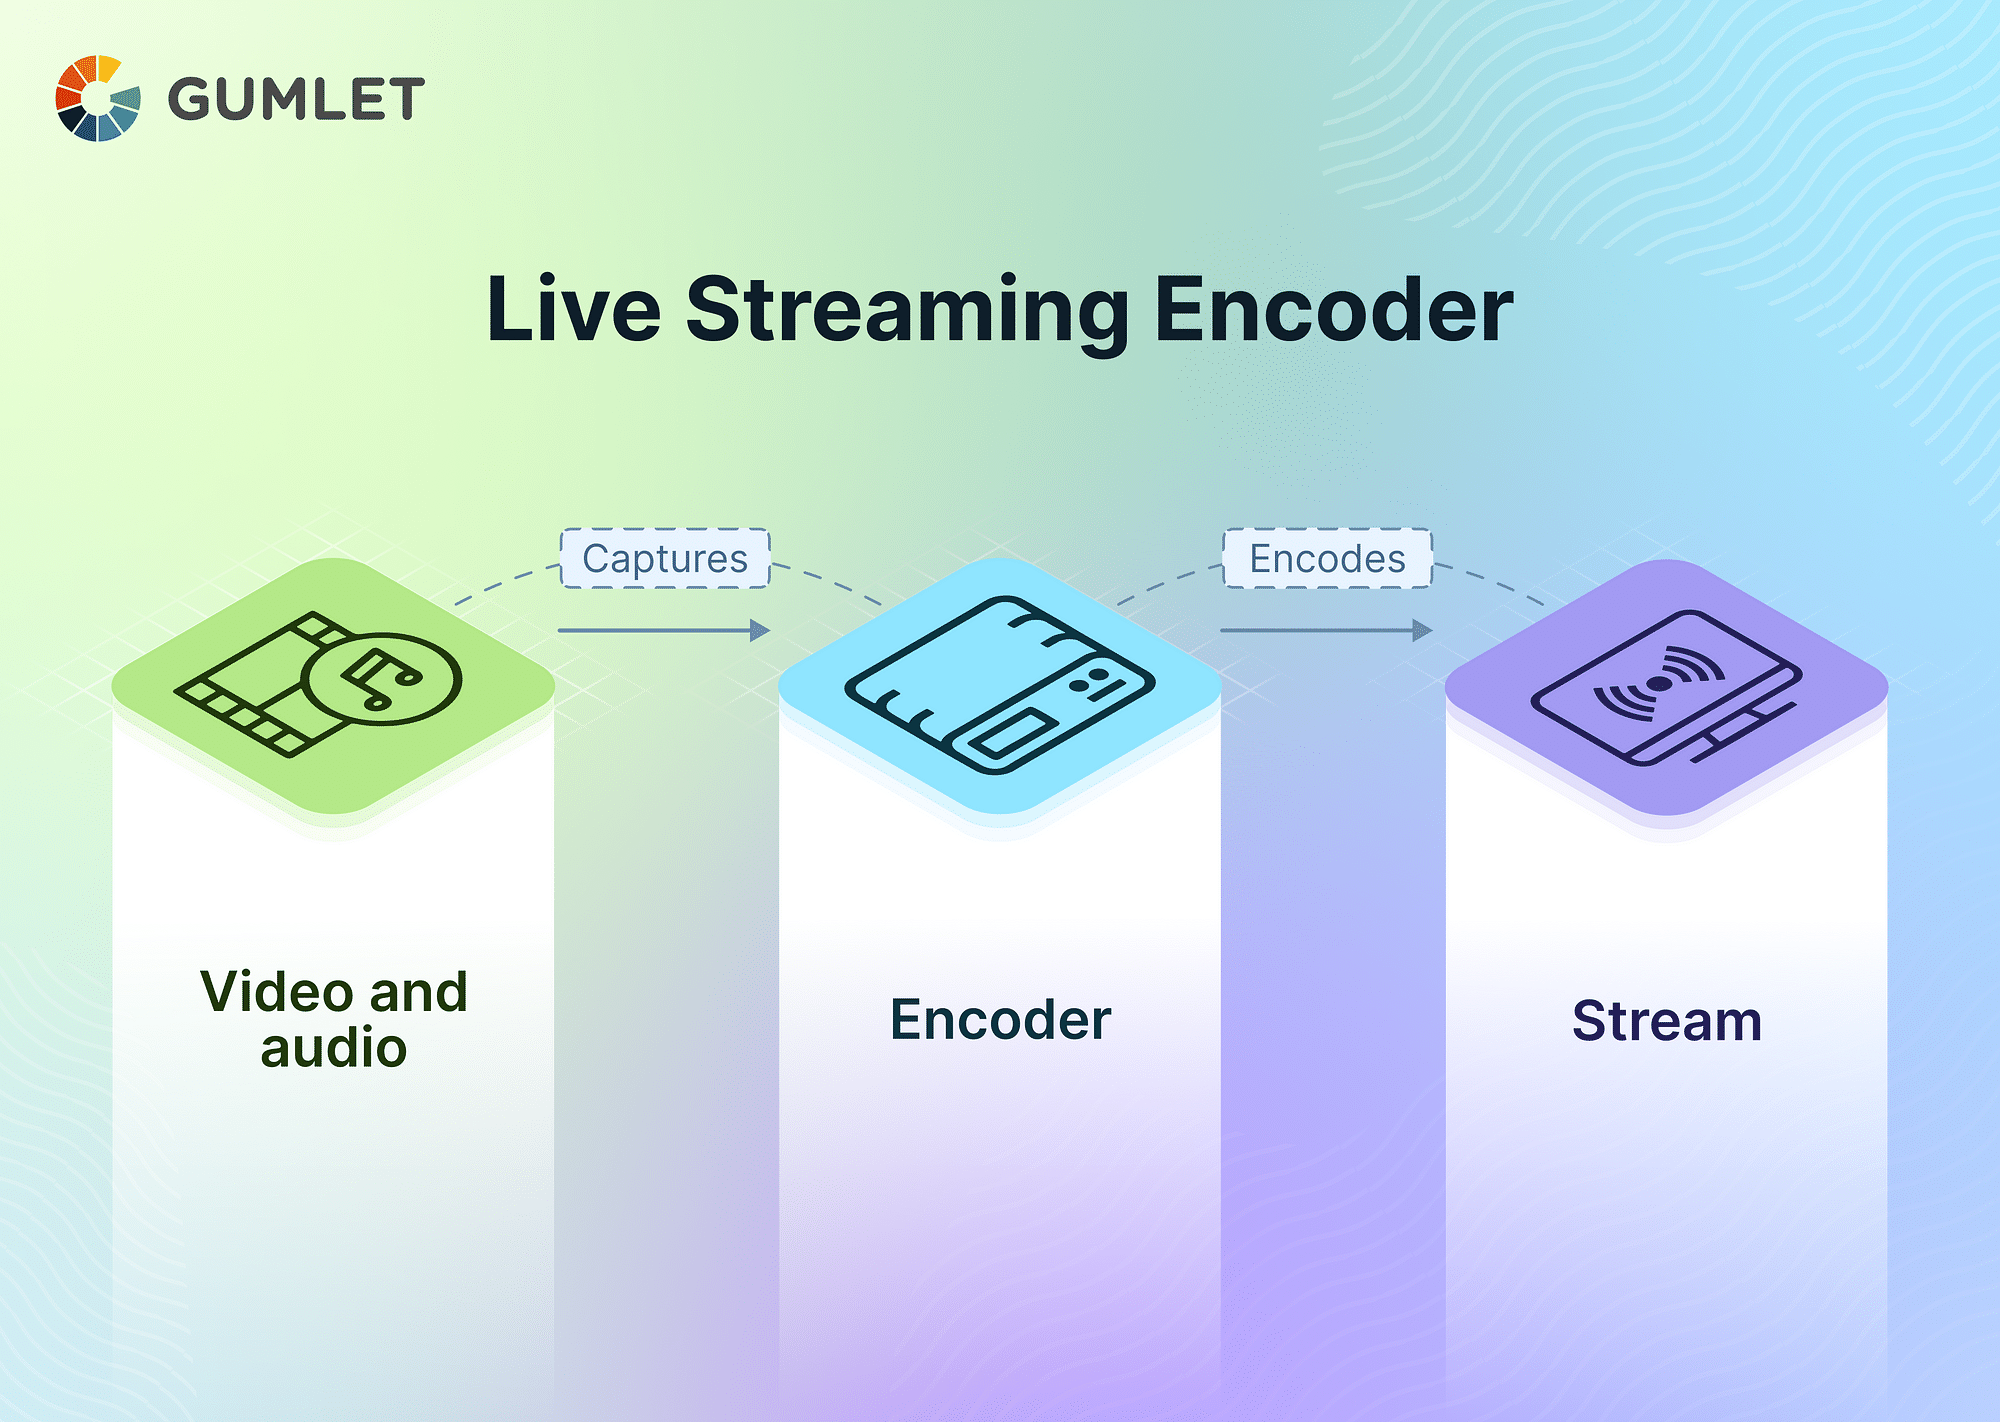
A live-streaming encoder is a software or hardware device that converts a live video feed from a raw video signal into a compressed digital format suitable for online streaming.
Using an encoder for live streaming is important as they facilitate the easy transmission of digital data by optimizing the video for different internet speeds and screen sizes. There are two main types of live stream encoders in the modern world - hardware and software. Both come with their own sets of perks and limitations. However, either of them can be used for efficient and high-quality delivery of video content in real-time.
Hardware Encoder vs. Software Encoder
As mentioned, there are two types of encoders for facilitating live streams over the Internet. You can use a software or hardware encoder to do the job for you. While both of them have the same functionality, they do share some key differences:
- Hardware encoders are better in terms of overall performance and reliability, as they can handle high volumes of video data without facing any complications. Software encoders are more resource-intensive and depend on the computer's processing power to perform the same task as efficiently.
- Hardware encoders are generally more expensive as they require more investment in additional equipment. On the other hand, software encoders are more cost-effective and can be run on existing computer systems.
- Software encoders are more customizable and remain up-to-date with new features introduced within the industry. Hardware encoders, on the other hand, remain rigid and are only limited to the features and options built into the device at the time of its launch.
Preparing Your Equipment and Internet Connection
If you want to deliver a high-quality viewing experience to your audience, you'll need to invest in some essential components that can make your live streams look more professional and presentable.
The most important pieces of equipment required for an uninterrupted streaming session are:
- Camera: To begin with, invest in a camera. If you're on a budget, your laptop's webcam will suffice. However, the good news is upgrading to a decent high-quality camera without breaking the bank is rather feasible these days.
- Streaming Software/Hardware: Next, install streaming software that handles the technical aspects. Look for a live-streaming encoder with additional capabilities like video editing, multistreaming, complex overlays, multiple screen layouts, guest stream facilitation, local video playback, live chat management, and stream analytics.
- Microphone: Investing in a high-quality microphone is crucial for attracting viewership. Neglecting a good microphone can significantly impact your content's appeal. The choice of microphone depends on your setup. If you host podcasts with movement, consider lav mics. For stationary streams from a single desk, standing/shotgun microphones are a better choice.
- Computer Setup: Finally, you'll need a laptop or desktop. Using a smartphone is possible but not recommended due to unstable wireless connections. Microphones and other equipment are better suited for computers. Ensure your computer meets the software/hardware requirements for streaming, and consider using an ethernet cable for a more stable connection compared to Wi-Fi.
- Internet Connection: A reliable internet connection with an upload speed of 5-10 Mbps (minimum) is recommended for smooth live streaming, although requirements may vary. Use a wired connection instead of Wi-Fi for stability. Avoid sharing the internet with other devices during streaming to prioritize bandwidth for a better viewing experience.
How to Set Up a Live-Streaming Encoder?
After choosing the specific hardware/software encoder you will use, it’s important to configure it as per your requirements.
A good streaming setup is essential for delivering your users a smooth and uninterrupted viewing experience. It will also allow you to concentrate solely on curating engaging content instead of worrying about managing the live stream midway.
1. Installing the Encoder Software
Depending on the type of encoder you have chosen, the procedure for setting them up and using them will vary.
For example, for installing a hardware encoder, you’ll generally have to follow these steps:
- Connect the encoding device to the video source.
- Connect the encoding device to the internet. It would help if you used the ethernet cable to create a more stable network.
- Configure the device settings by adjusting video bitrate, resolution, audio requirements, etc.
- Connect the encoding device to the streaming platform.
- Start streaming.
Installing software encoders is much easier. You don’t have to undergo the hassle of establishing multiple connections using physical cables. There are many live-streaming platforms that you can consider. All of them have different installation guidelines. But they still follow the same general pattern.
To give you an example, here are the steps for installing OBS Studio on your computer:
- Visit the official OBS Studio website at www.obsproject.com on your web browser. Locate the installer on the homepage and download it.
- After the download and installation process is complete, launch the OBS Studio application from either the desktop shortcut or the start menu.
- Configure OBS Studio as per your requirements. You can adjust different settings, alter video and audio sources, and play around with other customizable options until you get the hang of everything.
2. Connecting Your Camera and Audio Equipment
After setting up the encoder, you must ensure that all your other streaming components are functional and ready to use. Start by connecting your camera and microphone to the setup.
All you need to do is connect the camera and the microphone (or other audio equipment) to the computer using HDMI or SDI outputs. If you are using hardware encoders, ensure they have established a physical connection with the computer. Now, go to your streaming platform and configure the encoder settings to ensure that the audio and video signals are captured and compressed correctly.
3. Configuring the Encoder Settings
Next up, you should configure some advanced settings in your encoder as per your requirements. Doing so can be the difference between an average streaming experience and a great one.
Taking OBS as an example, mentioned below are some alterations you can make to the software’s default settings for an optimal streaming session. You can make these changes by accessing the “Settings” menu under the “Files” section.

Video Settings:
The first point of interest should be the video settings area. You can make multiple adjustments here, including altering the video capture resolution, framerate, etc.

The Base (Canvas) Resolution basically means what will be the size of your video capture. By default, it’ll be set as your entire screen. You can downsize the stream to only a portion of your scream, but it’s not a common practice among streamers.
The Output (Scaled) Resolution should either be smaller than the base resolution or the same.
The Downscale Filter determines the final look of your stream. It’s an essential component and should not be taken lightly. A common choice among streamers is Lanczos, one of the most detailed filters in the studio.
Output Settings:
Next, go to the output section. The first thing you need to do is change the Output Mode to Advanced.

Next up, go to the Recording section.
The most important setting here is the Recording Format field. Using MP4/MOV is inadvisable as doing so can make your video unrecoverable if there is a power outage or application crash. Using MKV or FLV is the safer option.
Another big decision is filling out the Encoder field. For this decision, consider the power and performance of your CPU and GPU.
For computers with an NVIDIA series GPU, NVENC is the best option. Mid-Range CPUs and AMD users should opt for AMF. On the other hand, if you have a powerful processor, x264 should be the best option.
Audio Settings:
Lastly, you should try altering your audio settings for the best possible listening experience. Go to the Advanced tab of the Output section and choose the Audio option.

In the main area, you will only have the option to change the bitrate. You can bump it up to 320 KBPS for a better experience.
Now, navigate the Audio Settings section by choosing Audio on the left pane.

The first thing that you want to do is keep the Sample Rate the same as your microphone’s.
Now, choose the Channel to be Stereo.
The Global Audio Devices is the section where you control your audio inputs. You should only use this section to enable or disable the audio inputs you will use in your live streams. Everything else should not be altered or changed.
4. Testing Your Live Stream
Next up, streamers should ensure all their settings and configurations run smoothly. For example, here’s how you can give a trial run to your live stream settings using OBS Studio:
- Navigate to the application's homepage after adjusting the settings and choosing your streaming service.
- On the bottom right of the page, click on Start Streaming.
- After recording for a few seconds, stop the stream and run your diagnostics.
- Check out the recorded footage for any inconsistencies. You can also consult the OBS Studio log to see if there are any errors. It’s located under the View section in the Logs area.
5. Troubleshooting Common Issues
After you’ve set up everything correctly, you still might want to troubleshoot a few things. These are some of the common problems that many streamers face and had to spend hours looking for a solution.
To save you time, here’s a list of common issues that you might face while using your live-streaming encoder, along with their potential solutions:
Poor Video Quality or Excessive Buffering
- Make sure that you have a stable internet connection.
- Try lowering the video capture resolution and bitrate settings.
- Switch to a wired connection if you are still using wireless alternatives.
- Restart or reinstall your encoder software.
Live Streaming Platform Crashes
- Make sure your encoding software is updated to the latest version.
- Check if there are any conflicting/interfering plugins or software.
- Try increasing the buffer size and bitrate settings.
- Restart your computer system and streaming setup.
Low Quality or Laggy Audio
- Make sure that you have inputted all your audio sources correctly.
- Adjust the audio levels to see if they are clipping because of loud/low volume.
- To improve sound quality, try using an external audio interface.
Incorrect Settings or Error Logs in the Encoder
- Double-check all the encoder and streaming settings that you have set up.
- Reset all settings to default.
- Check for typos and spelling mistakes in your stream key or URL.
Key Features To Consider When Choosing an Encoder
Here’s a list of considerations to have in mind before you invest your hard-earned money in purchasing a live-stream encoder:
- Compatibility: The encoding platform should be compatible with all modern devices and systems, especially the operating system and hardware you will use.
- Video and Audio Quality: Go for modern encoders that quickly support high-quality video and audio encoding. It should allow you to adjust bitrate, capture resolution, and other similar settings for stream optimization.
- Ease of Use: While the features should be plenty and complex, using them shouldn’t be too hard. Look for an encoder with intuitive controls and a simple interface.
- Customization Options: Make sure that your encoder offers you a ton of customization options, like adding overlays, logos, or watermarks effectively to your live stream.
- Streaming Options: Modern encoders allow various options like multi-bitrate, adaptive bitrate, and simultaneous streaming. All of these are important for different types of streamers, and you should look for an encoder that supports all such options.
- Technical Support: Only go for an encoder that offers solid technical support. You should be able to get key analytics of your stream, error logs, statistics, and so on.
Best Live Streaming Encoder Software
Still can’t make up your mind? Don’t worry; we’ve come up with a list of some of the best live-streaming encoding software to help you with your streaming career.
All of these platforms are different in their functionality and offer various advantages.
1. WireCast (Top-Tier Encoder)
If you’re looking to spare no expense and focus only on the quality of features offered, WireCast should be your primary option. It is a high-end streaming encoder and compatible with many different systems and tools, making it a popular option for professional use. WireCast comes in two shapes and forms - the Studio and Pro versions. While both are paid, the Pro version offers multiple standout features you are not likely to find in other modern-day encoders. WireCast is the best encoder if high-quality streaming is your priority.
Price Point:
- Studio Version comes at $599 for a one-time license after a trial period.
- Pro Version comes at $799 for a one-time license after a trial period.
Pros:
- Compatible with most devices and operating systems.
- Simple and easy-to-use interface.
- Offers a one-time purchase plan.
- Equipped with high-end features and supports high-quality streams.
Cons:
- High price point.
- Many valuable features are not available in the Studio version.
- Costly upgrades.
2. OBS Studio (Best Free Encoder)
While WireCast is certainly an attractive option, it’s not for everyone’s wallets. Fortunately, you don’t always have to spend like a King if you want to live stream your content. Platforms like OBS Studio provide the same services at no additional costs. Open Broadcaster Studio (OBS) is an open-source encoder hailed popularly as the best broadcasting software for YouTube. It is compatible with all traditional Operating Systems, including Windows, Mac, and Linux. It’s best for beginners who are looking to build a name within the streaming community.
Price Point:
- Open-source software; can be used for free.
Pros:
- It’s absolutely free.
- Easy to use and specialized for beginners.
- Offers frequent updates.
- Supports low-resolution streaming over unstable internet connections.
- It can offer great video and audio quality.
- Contains all basic tools and some extravagant features for supporting live streams.
Cons:
- Limited features.
- Plugins need to be added and improved.
- User support is minimal.
- Small glitches are common while using the platform.
3. StreamLabs OBS (Best Alternative for OBS Studio)
OBS Studio is a great encoder for beginners. But once you hit the ground running, you’ll need some extravagance and flair in your streams. Unfortunately, OBS is just not equipped to give you these additional features. This is where StreamLabs OBS comes in, an updated version of OBS Studio. While it has higher CPU usage and can be a little more complicated to use, StreamLabs OBS comes with tons of new features, exciting add-ons, and customizable options to enhance your live streams.
Price Point:
- Open-source software; can be used for free.
Pros:
- Free of cost.
- Provides exciting automated setups.
- Easy stream management options.
- More powerful chat integration.
- Exciting mod tools.
- Fun features for enhancing the streaming experience.
Cons:
- More complicated interface.
- CPU usage is higher compared to competitors like OBS Studio.
- It might offer more features than you would normally use while streaming.
4. Elgato (Best Gaming Encoder)
While OBS Studio and StreamLabs OBS offer a ton of advantages, they are not powerful enough to allow experienced gamers to establish engaging live streams. Elgato’s “Game Capture” encoder is the more suitable option for this. It offers multiple wins over other alternatives, including easy setup, one-click streaming to popular platforms like YouTube and Twitch, customizable overlays, and multi-device support.
Price Point:
- Elgato’s Game Capture encoder is free. But the company’s hardware products can range anywhere between $129 and $700 for basic and professional gaming setups, respectively.
Pros:
- Extremely easy to set up and easy.
- Advanced features like scene switching and sound mixing are possible with Elgato’s exclusive line of hardware products.
- Offers sound integration with popular streaming platforms.
- Customizable overlays and other visual elements are present.
- Multi-device setup is supported.
Cons:
- Customization options are limited compared to other competitors.
- Works best with Elgato’s hardware products, which can be expensive.
Best Practices for Live Streaming
There are tons and tons of live streamers out there. Your stream must be perfect if you want to gain an edge over your competitors.
Before jumping on to the more advanced aspects, figure out your basics. Make sure that you implement these practices while broadcasting your streams:
- Ensure you run a test stream to check out your camera, video quality, and other potential issues before presenting the stream to an audience.
- Check your internet connection and see if it’s stable. Try using wired connections for a better streaming experience.
- Create an outline or a rough script to plan your content instead of jumping head-first into the stream without knowing what you will do or say.
- Engage with your audience regularly. Hold question and answer sessions, respond to their queries, follow their prompts, and so on.
- Have a solid backup plan of what you will do in case of technical glitches.
- Promote your stream in advance on popular channels and social media platforms.
- Include an appropriate call to action at the end of your stream.
- Monitor and analyze your performance by looking at the analytics and statistics.
FAQs
1. How to optimize your internet connection for a live stream?
You can optimize your internet connection for efficient live streaming by using a wired connection, closing unnecessary programs, and adjusting the resolution and bitrate settings.
2. How to monitor your live stream?
You can monitor your live streams by using analytics tools provided by the encoder or the streaming platform you use. You can also use third-party software like StreamLabs OBS to track relevant metrics such as viewer count, stream health, etc.