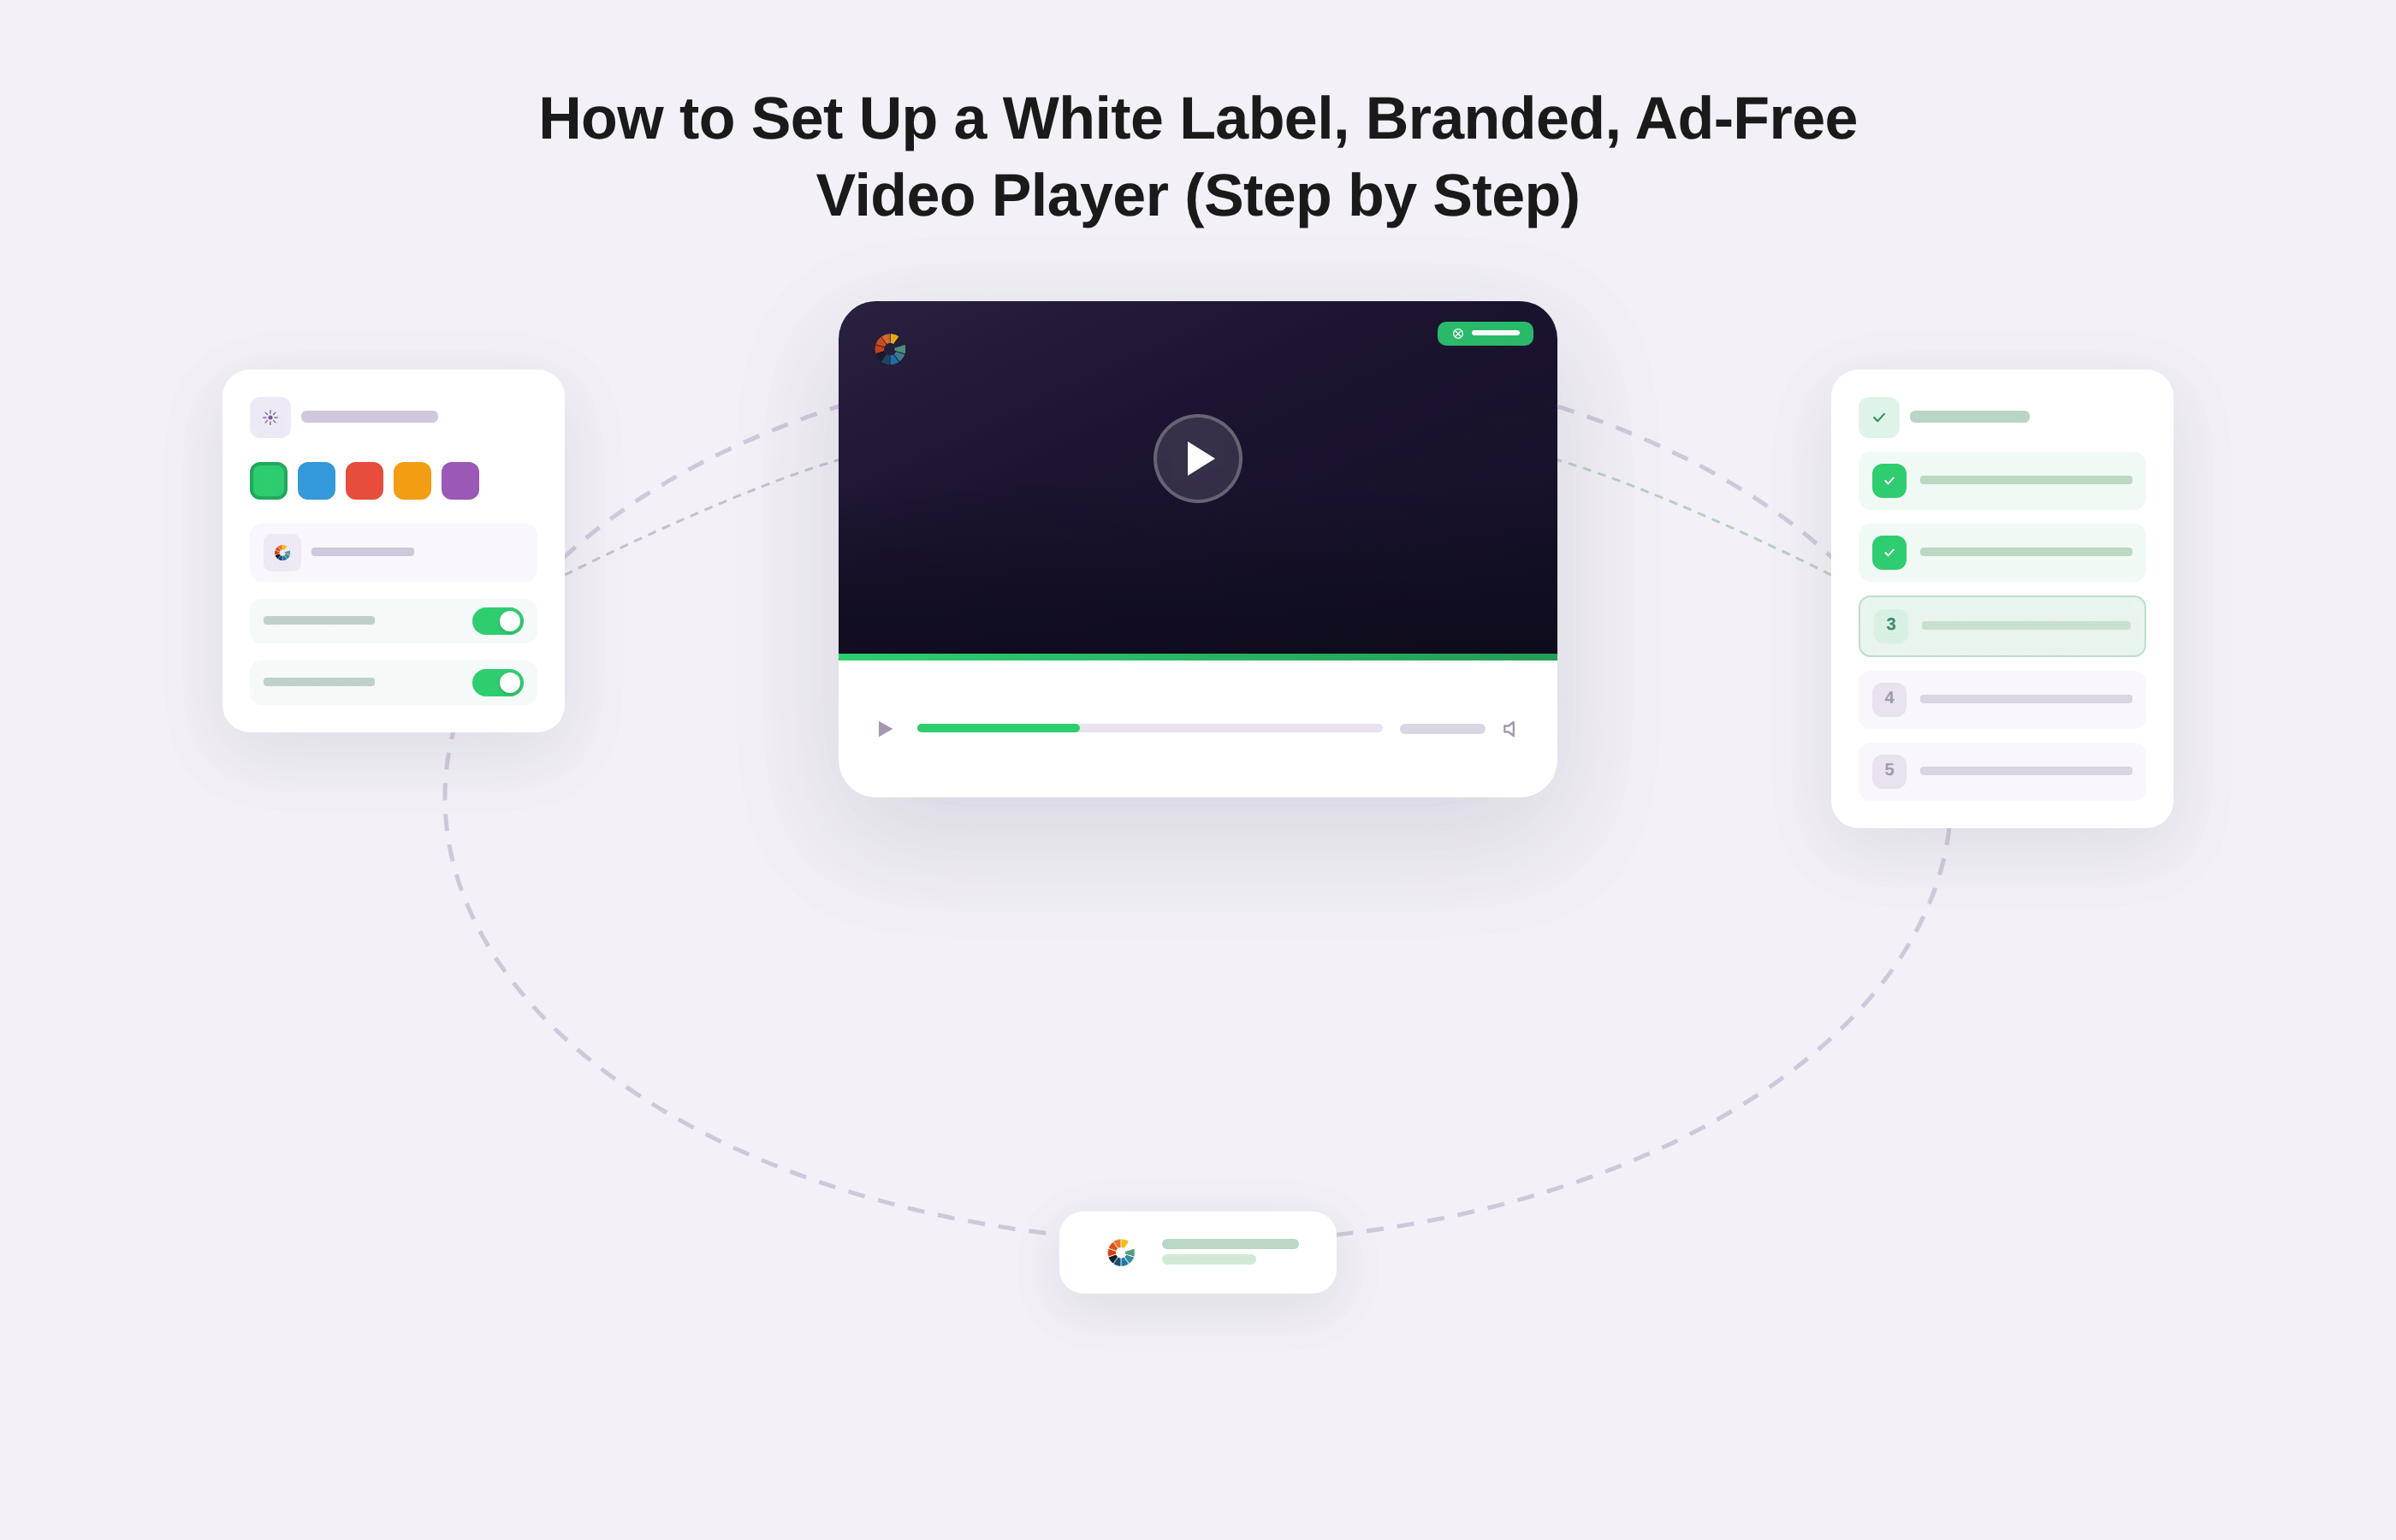
An ad-free video player serves your content from first frame to last with zero pre-roll ads, no "up next" recommendation grid, and no vendor watermark sitting over your work. Setting one up is really three jobs done in order: ad-free hosting, then white-labeling to strip everyone else's identity, then branding to add yours. Get that sequence right and your player stops being a rented box on someone else's platform and becomes part of your product. This guide walks the full setup both ways the fast hosted path and the full-control self-hosted path and shows exactly where each control lives.
Key Takeaways (TL;DR)An ad-free video player plays your content with zero ads, no "up next" recommendations, and no vendor logo.You're setting up three layers in order: hosting → white-labeling (removing others' branding) → branding (adding yours).Fastest path: a hosted platform with genuine white-label settings (e.g., Gumlet). Most-control path: self-host with an open-source player (Video.js or Plyr) plus a CDN.YouTube and Vimeo embeds can't be made truly ad-free —rel=0andmodestbrandingstopped working as ad controls years ago."Free" tiers are where ads and watermarks sneak back. Verify before you publish, and re-verify after every platform update.
At Gumlet, the single most common question we hear from teams switching off YouTube isn't about resolution or bandwidth - it's "will my viewers still see their ads and their recommended videos?" The answer depends entirely on which of the three layers above you actually finish. Most people complete hosting, skip the white-label step, and ship a clean-looking player that still wears someone else's badge.
Self-Hosted vs. Hosted Platform: Which Ad-Free Setup Should You Choose?
Choose self-hosted if you have engineering support and want to own the entire stack; choose a hosted platform if you want to publish this week without managing encoding or bandwidth. That's the decision in one line - here's the detail behind it.
Self-hosted means your own server or object storage, an open-source player like Video.js or Plyr, and a CDN to deliver the files. It's ad-free by default because no vendor is in the loop to inject anything. The trade is that you own encoding, adaptive delivery, bandwidth costs, and maintenance.
A hosted video platform with white-label settings is faster. It handles encoding and global delivery for you and exposes branding controls through a settings panel or API. The catch: you must verify the plan genuinely strips vendor branding and never serves ads, because many platforms only guarantee that on higher tiers.
| Factor | Self-hosted (Video.js / Plyr + CDN) | Hosted platform (e.g., Gumlet) |
|---|---|---|
| Ads | None by default | None if the tier guarantees it |
| Setup speed | Slow - you build it | Fast - settings panel |
| Engineering needed | High | Low to none |
| Encoding & adaptive streaming | You own it | Automatic (HLS) |
| Bandwidth cost | Yours to manage | Bundled in plan |
| White-label control | Total | Plan-gated toggle |
This guide isn't a ranked product list. If you want specific tools compared head-to-head, see our companion roundup of the best ad-free video players, then come back here to do the actual setup.
What You Need Before You Start (Prerequisites Checklist)
Have these ready before you touch any settings, so the setup runs straight through instead of stalling halfway:
- Your video files, ideally at the highest source quality you have, since you can always compress down but never add detail back.
- Your account or stack is set up based on the approach you chose above (either a platform account or a server, player library, and CDN).
- A custom domain or subdomain dedicated to playback, so your video URLs and the player itself read as yours.
- Your brand assets: a logo file with a transparent background, your exact hex color codes, and your brand font if the player supports it.
- Access to your website's CMS or wherever the embed will live, so you can drop in the player without waiting on someone else.
Each of these is something to gather now, not a step to perform. The how-to starts next.
How to Set Up Your Ad-Free Video Player: Step by Step with Gumlet
Gumlet is a hosted video platform built around exactly the three layers this guide describes: it handles encoding and global delivery, lets you strip its branding, and gives you a settings panel to add your own. The steps below map to where these controls actually live in Gumlet, so you can follow along in the dashboard rather than guessing at generic toggles.
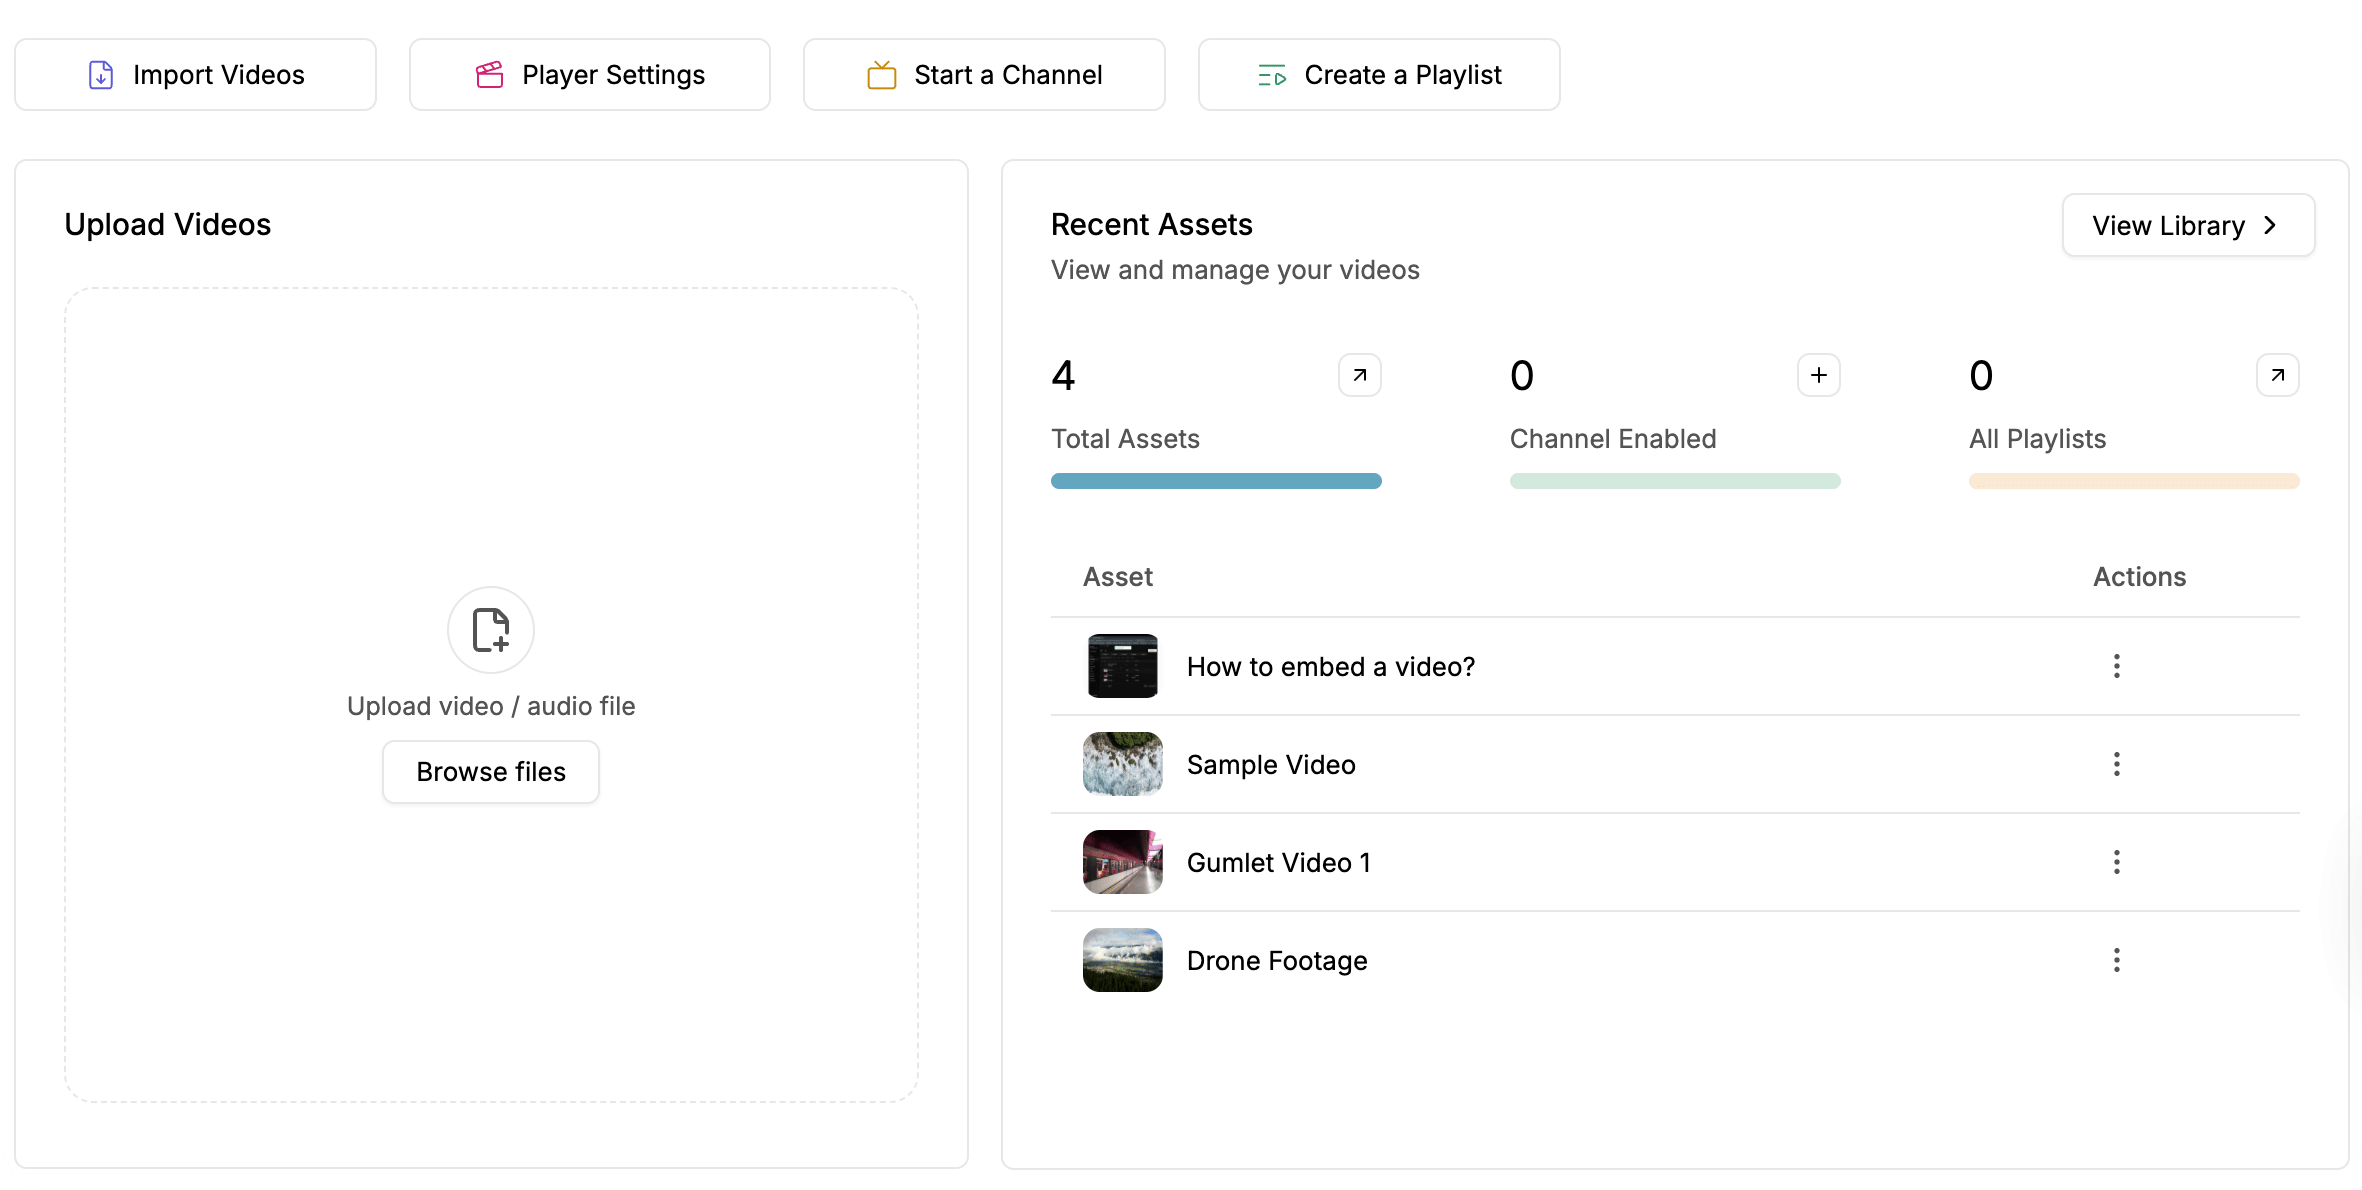
Step 1: Upload Your Video and Let Gumlet Handle Delivery
Create your Gumlet account and upload your source file to the Video Library — from your device, from cloud storage, or via imports from Vimeo, Wistia, Zoom, or Google Drive. This is the foundation on which everything else sits, so confirm the upload processed cleanly before you style anything.
You don't configure adaptive streaming by hand. Gumlet transcodes your source into HLS renditions automatically and serves the right quality for each viewer's connection and device. That's what makes the video start fast and stop stalling on weak networks. While the file processes, enable the MP4 version in your processing settings if you'll want a download button later; that button only appears for MP4-enabled videos.
Why this matters: Google's Core Web Vitals guidance puts the "good" Largest Contentful Paint threshold at 2.5 seconds or less. A slow first frame loses viewers as effectively as an ad does, so adaptive HLS isn't a nice-to-have; it's part of staying ad-free in effect.
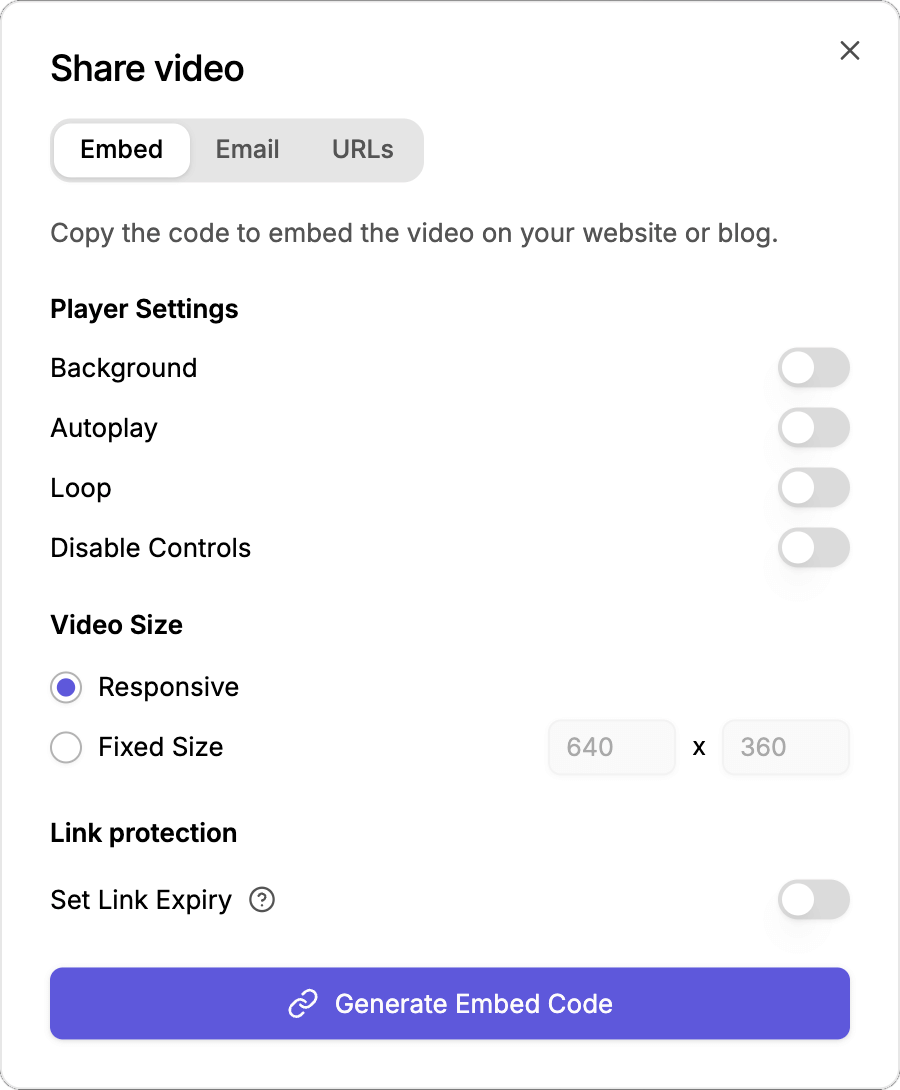
Step 2: Generate a Clean Embed
Open the video and grab its embed code from the dashboard or via Gumlet's player customizer, which uses your video asset ID to generate a tailored iframe snippet. Use Gumlet's native iframe embed, dropped straight into your page. Don't route it through a social share embed; that pulls in another network's ads and tracking.
This is also where you decide what shows when the video ends. Instead of leaving viewers on a frozen final frame, add a Custom End Screen or Lead Capture card to send them deeper into your funnel. Configure that now, so your finished video converts the attention you already have instead of dead-ending. Paste the embed into your page only after the end-of-video behavior is set the way you want.
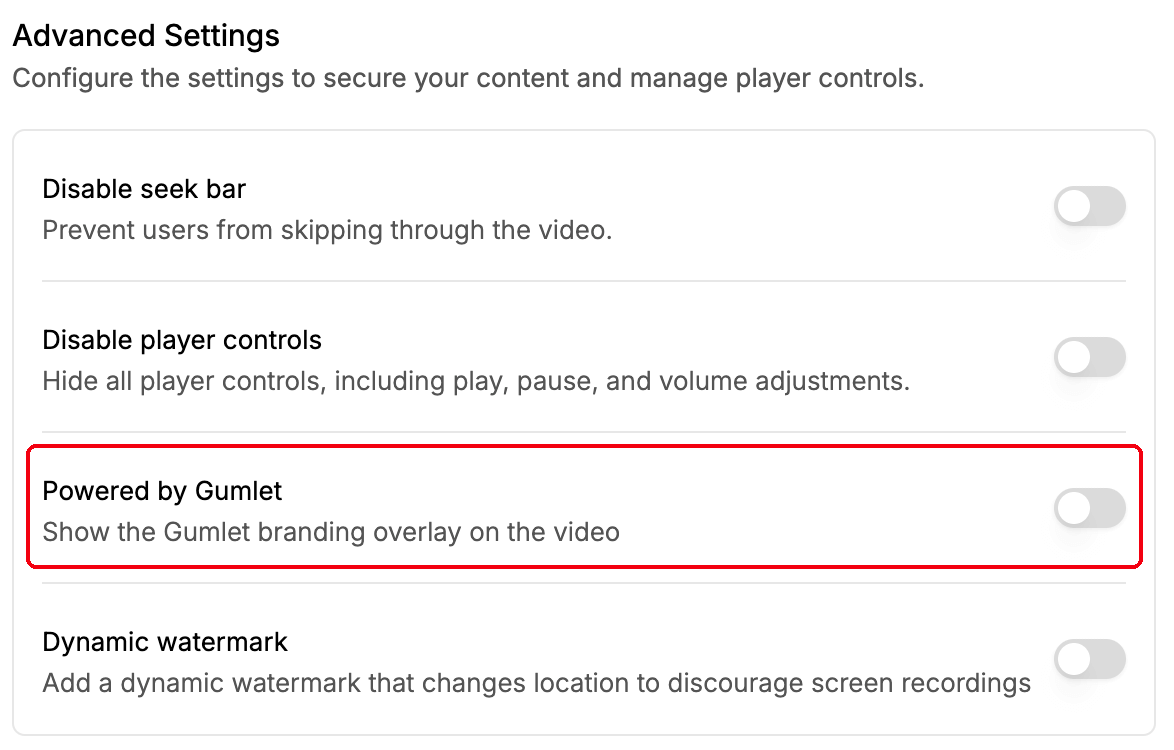
Step 3: Remove the Branding if required(White-Label)
By default, the player carries a "Powered by Gumlet" logo in the corner. To remove it, go to Player Settings and scroll down to Advanced Settings. There, you can toggle off the "Powered by Gumlet" option and watch the final result in the dashboard.
Be aware that this is plan-gated: disabling the "Powered by Gumlet" logo requires the Growth or Business tier. If the toggle is greyed out or prompts an upgrade, that's the platform telling you the free plan was never truly white-label. This is the honest version of the question we get most: "Is the free tier white-label?" It almost never is, on any vendor. Budget for the tier that unlocks it, or a badge in the corner quietly undoes the rest of this work.
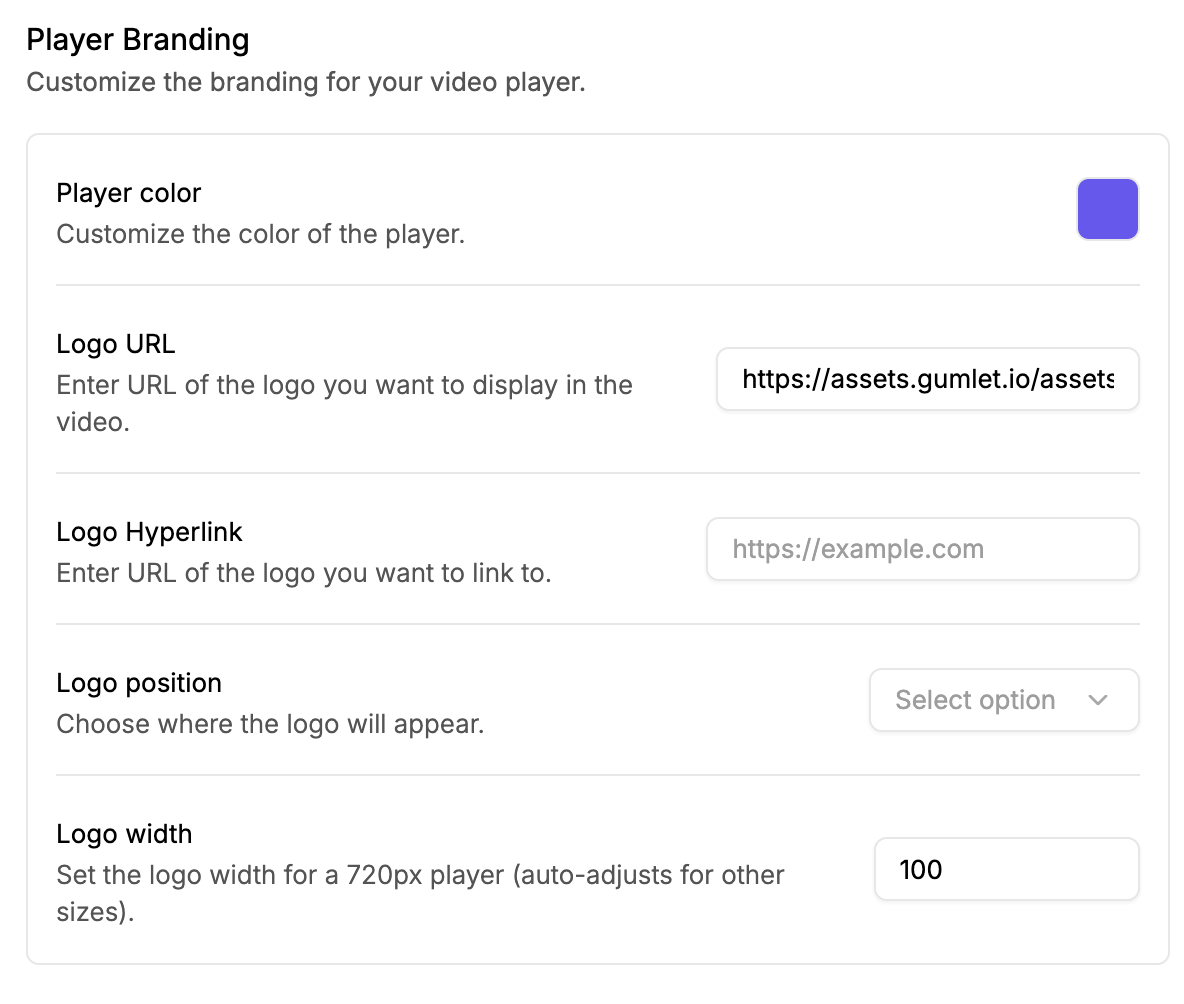
Step 4: Add Your Branding (Logo, Colors, Captions)
With Gumlet's identity removed, add your own in Player Branding. Go to Player settings again and scroll down to the Player Branding settings. Set a Logo URL pointing to your image, then use Logo Position and Logo Width & Height to place and size it where Gumlet's mark used to sit. If you serve sensitive or paid content, the Dynamic Watermark option overlays moving, viewer-specific text (such as an IP) as a deterrent, useful, though not required for branding.
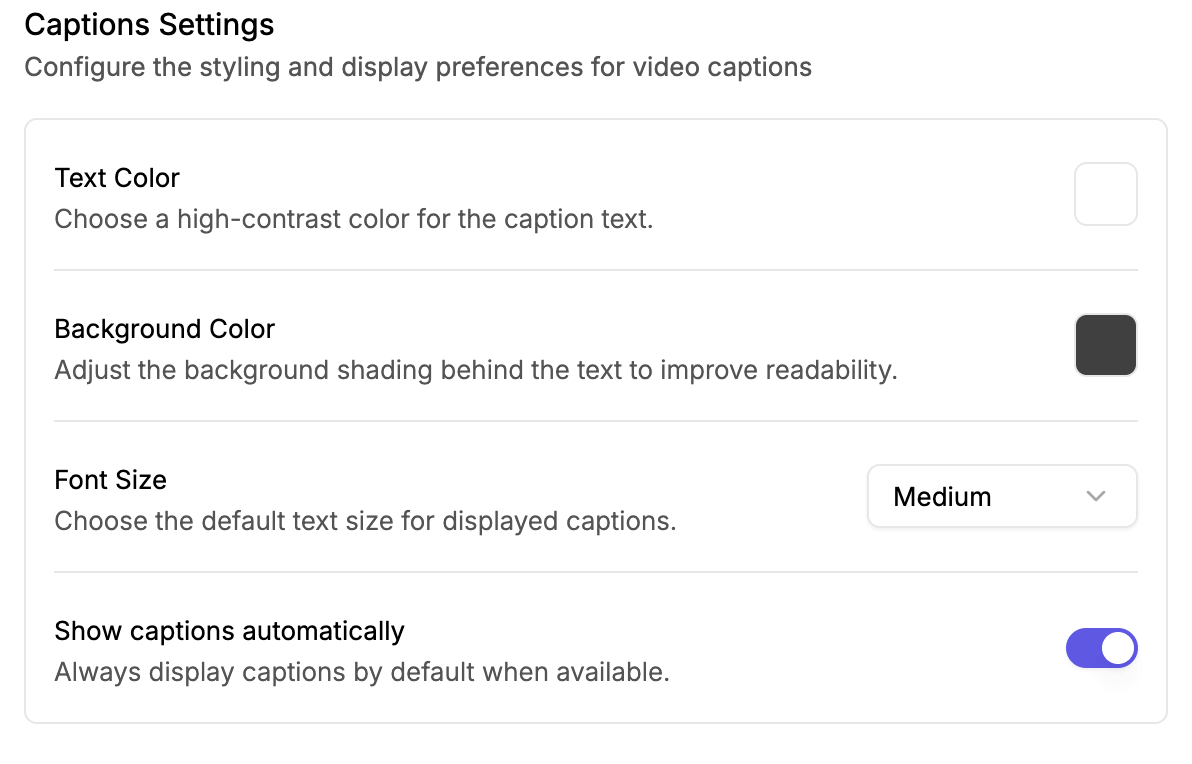
Carry the brand through to the details that read as off-brand when left at default. Scroll down to the Captions Settings, which is right below Player Branding, set the subtitle text color, background color, and font size to match your palette, and decide whether captions show automatically. Keep this distinct from Step 3 in your head: Step 3 removed someone else's identity; this step puts yours in its place.
Step 5: Configure Playback, Controls, and Viewer Experience
You can shape behavior in Gumlet's Player settings by using General and Advanced Settings; this is what separates an intentional setup from a default one.
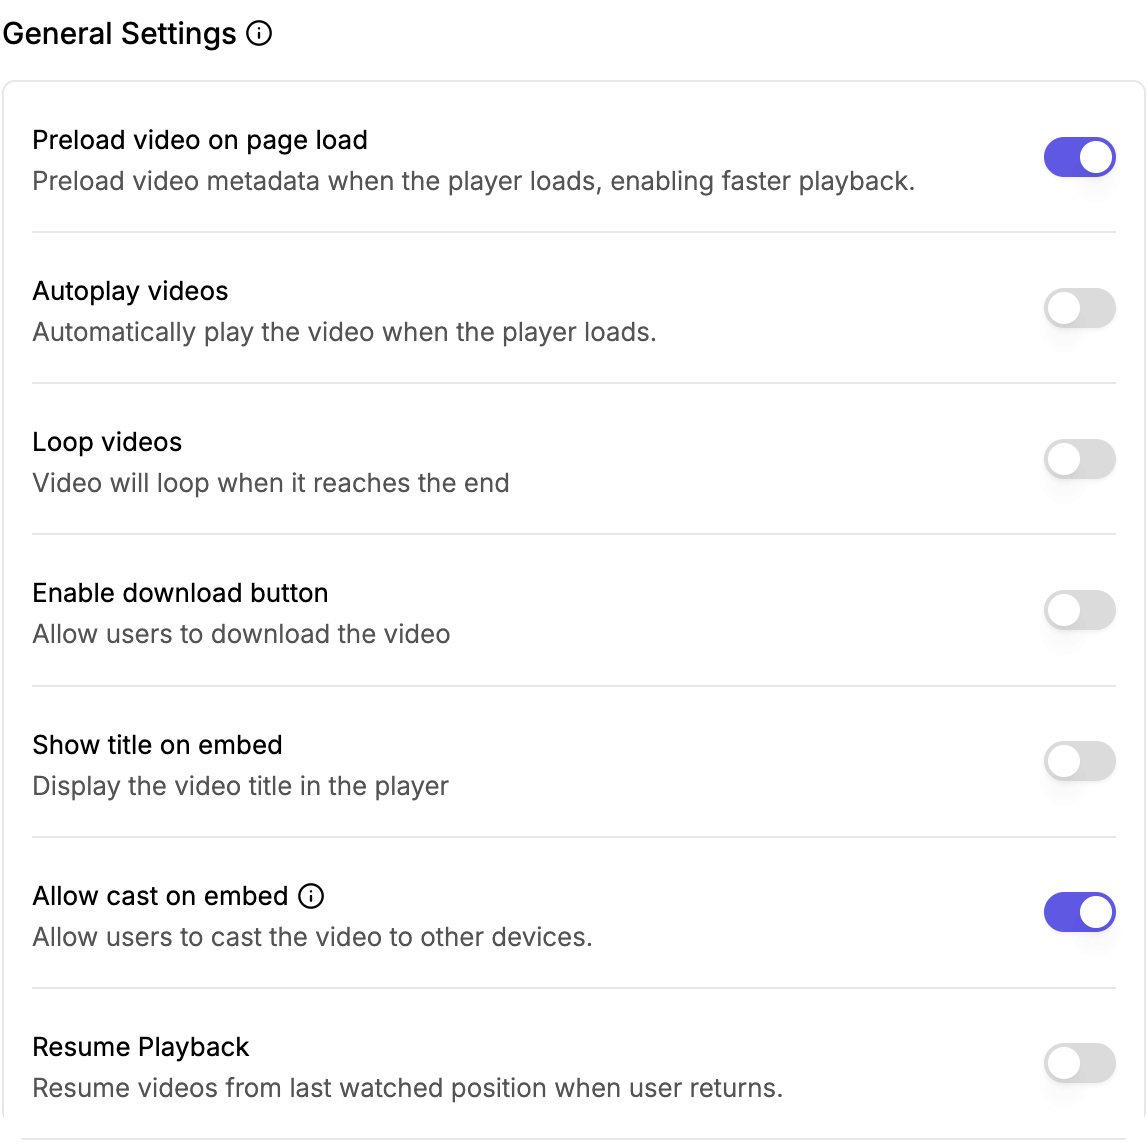
In General Settings, choose your autoplay rule. Note that Gumlet mutes audio on autoplay across all browsers and devices because modern browsers require muting for autoplay to fire. Set Loop to replay, Preload to cut load time at the moment of play, Show Title for context, and Allow Cast so viewers can send the video to AirPlay or Chromecast. For courses or OTT, Resume Embedded Videos lets returning viewers pick up where they left off.
In Advanced Settings, tighten control further. Disable the Seek Bar to stop viewers from skipping ahead in training content. Disable Player Controls keeps attention purely on the video. And in Advertising & Monetization, leave the VAST Tag field empty. That field is where ads are injected via Google's IMA SDK during playback, so an empty VAST tag is precisely what keeps the player genuinely ad-free.
How to Self-Host an Ad-Free Player (The Most-Control Path)
Self-hosting an ad-free player requires four components: a transcoded HLS source, an open-source player, a CDN, and a few lines of initialization code. Because no vendor sits in the delivery path, there's nothing to inject an ad or a logo; it's ad-free by construction.
Here's a minimal Plyr + HLS.js setup that plays an adaptive stream from your own CDN:
html
<link rel="stylesheet" href="<https://cdn.plyr.io/3.7.8/plyr.css>" />
<video id="player" controls playsinline></video>

<script src="<https://cdn.jsdelivr.net/npm/hls.js@latest>"></script>
<script src="<https://cdn.plyr.io/3.7.8/plyr.polyfilled.js>"></script>
<script>
  const source = '<https://cdn.yourdomain.com/video/master.m3u8>';
  const video = document.getElementById('player');

  if (Hls.isSupported()) {
    const hls = new Hls();
    hls.loadSource(source);
    hls.attachMedia(video);
    new Plyr(video);
  } else if (video.canPlayType('application/vnd.apple.mpegurl')) {
    // Safari plays HLS natively
    video.src = source;
    new Plyr(video);
  }
</script>
Three things to get right beyond the code: transcode your source to HLS so it adapts to each viewer's bandwidth, serve the .m3u8 and segments from a CDN (not your origin) so playback stays fast globally, and brand the player with Plyr's CSS variables to match your palette. Video.js works the same way if you prefer its plugin ecosystem. The software is free; the clean hosted experience, encoding pipeline, CDN, and storage are the parts you pay for in time or infrastructure.
Why You Can't Make a YouTube or Vimeo Embed Truly Ad-Free
You can't fully strip ads or the logo from a YouTube embed; the parameters that used to help no longer do. This misconception sends most people down the wrong path, so it's worth being precise.
rel=0 Once, it disabled related videos entirely; since 2018, it has only limited suggestions to the same channel, and it can't suppress them when a viewer is signed in. modestbranding is deprecated and never removed ads to begin with. Privacy Enhanced Mode (youtube-nocookie.com) delays tracking cookies until play, but it explicitly does not stop ads. And whether ads run at all is controlled by the video's monetization settings, which an embedder can't override from the embed code.
Vimeo gets you closer; its player can hide the logo, title, and end-screen suggestions, with no ads on paid tiers, but you're still inside someone else's player, subject to their policy changes and bandwidth caps. For genuine, permanent control, the real options are the two in this guide: a hosted platform that guarantees no ads, or a self-hosted player you own outright.
How to Migrate Existing YouTube Embeds Without Redoing Every Page
If you already have dozens of YouTube iframes scattered across old posts, you don't replace them by hand. The efficient migration is: export your source videos, upload them to your ad-free host, then swap the embeds, ideally with a CMS-level find-and-replace or a WordPress integration that detects existing iframes and substitutes your new player automatically.
Two cautions about doing this at scale. First, keep your new URLs on a dedicated playback subdomain so the swap doesn't break later if you change hosts again. Second, re-test the highest-traffic pages first; a migration that works on your newest post can behave differently on a 2019 article with legacy embed markup. Fix the pages that earn the most views before the long tail.
How Do I Test and Maintain a Genuinely Ad-Free Experience?
Setup gets you live; testing and upkeep keep you clean. Run QA across the browsers and devices your audience actually uses, then check the embedded contexts that behave differently: social feeds, email previews, and in-app browsers. Open the video in full screen and on a phone specifically, since those views expose logos and layout issues that the inline desktop player hides.
After any platform update, re-check your branding and ad settings. Vendors do occasionally change defaults or adjust what lower tiers include, and a quiet change on their end can put a badge back on your player without warning. Watch load speed too: keep your first frame under that 2.5-second LCP threshold, because a slow start loses viewers just as effectively as an ad does. For business viewers, this consistency reads as trust; a player that's clean today and shows a stray watermark next month attaches that carelessness to your brand, not the vendor's.
Frequently Asked Questions
What makes a video player truly ad-free, and why does it matter?
A truly ad-free video player plays your content start to finish with no advertising, no "up next" recommendation grid, and no third-party logo over your work. The reason it matters is concrete: a single competitor ad or one "up next" suggestion is all it takes to pull a viewer off your page and into a feed designed to keep them anywhere but with you, and that leak happens at the most expensive point in your funnel, the moment they're most engaged. A standard YouTube or Vimeo embed is the usual culprit because even when you, the uploader, see no ads, your viewers can be served pre-roll spots, end-screen grids, and a persistent platform logo. An ad-free player is a control decision: you're choosing who owns the viewer's attention at the peak of engagement, you, or someone else's recommendation algorithm.
What's the difference between white label, branded, and customizable video players?
These three words name layers that stack, not synonyms, and a polished player has all three at once. A white-label player removes third-party identity: no vendor logo, no "powered by" badge, no platform watermark. A branded player adds your identity instead: your logo, your accent colors, playback from your own domain. A customizable player controls behavior and appearance: the control bar, autoplay rules, default thumbnail, captions styling, and end-of-video behavior.
| Layer | What it does | Your action |
|---|---|---|
| White label | Removes vendor logos and watermarks | Subtract their identity |
| Branded | Adds your logo, colors, and domain | Add your identity |
| Customizable | Controls behavior and appearance | Shape the experience |
Skip the white-label step, and your branding sits next to a competitor's badge. Skip branding, and you have a clean but anonymous box. The finished player is all three.
Is there a free, ad-free video player?
Yes and no. Free, open-source players like Video.js and Plyr are genuinely ad-free because no vendor inserts anything; you supply your own hosting and delivery. Free hosted tiers are different: they typically add a watermark, an upgrade prompt, or usage limits once you cross a cap. So the player software can be free; the truly clean hosted experience usually isn't.
Can I make a YouTube or Vimeo embed ad-free?
Only partially, and not permanently. You can disable some related-video and end-screen options, but rel=0 only limits suggestions to the same channel (and not for signed-in viewers), modestbranding is deprecated, and Privacy Enhanced Mode doesn't stop ads. You can't remove YouTube's underlying ad infrastructure or logo from an embed, and the policies can change without your input. For full control, host on a platform that guarantees no ads, or self-host your own player.
Do I need to code to set up a customizable video player?
Not for hosted platforms. A hosted, customizable video player is configured through a settings panel or simple API, so non-developers can set autoplay, colors, captions, and CTAs without writing code. Self-hosting is where light coding comes in — you initialize the player and wire up your HLS source yourself, though libraries like Plyr keep that to a few lines, as the snippet above shows.
What mistakes secretly reintroduce ads or break your branding?
Most guides stop at "embed and done." These are the traps that quietly undo all of it:
- Trusting a free tier that flips on branding after a quota. Some plans run clean until you hit a view or bandwidth cap, after which they show a watermark or an upgrade prompt. Read the tier limits, not just the headline features.
- Leaving "related" or "recommended" videos on. The single most common way competitors sneak back. Disable suggestions during embedding and re-verify after any platform update.
- Using third-party social embeds. A social share embed pulls in that network's ads and tracking. Use your player's native embed instead.
- Relying on default end screens. Defaults frequently surface other creators. Replace them with your own CTA card or a loop.
- Mismatched player colors. Accent colors left at the platform default read as off-brand. Match them to your exact hex values.
- Forgetting mobile and in-app browsers. A player that's clean on desktop can behave differently inside the Instagram or LinkedIn in-app browser. Test those contexts, because that's where much of your traffic actually watches.
How do I test and maintain a genuinely ad-free experience?
Run QA across your audience's real browsers and devices, then check the contexts that behave differently: social feeds, email previews, in-app browsers, full screen, and mobile. Re-verify branding and ad settings after every platform update, since vendor defaults can change quietly. And keep first-frame load under the 2.5-second LCP threshold, because a slow start costs you and viewers the same way an ad does.
Conclusion
Setting up your own player comes down to three layers, in this order: clean, ad-free hosting first; then white-labeling to strip away everyone else's identity; then branding to add yours. Get those right, and the player stops being a rented box and becomes part of your product.
The fastest way to feel the difference is to set one up on real content and watch a video end without a single suggestion pulling your viewer away. Start a trial, or read our companion comparison if you want to weigh specific tools first, then launch an ad-free video player that keeps every viewer exactly where you earned them.