Ever wanted to show someone exactly what's happening on your iPhone screen? Maybe you're trying to guide a less tech-savvy family member through an app, show off your epic gaming skills, demonstrate a bug to a developer, or even just save a snippet of a video call (with permission, of course!). That's where screen recording comes in, and thankfully, Apple has made it incredibly easy to screen record on iPhone.
This guide will walk you through everything you need to know, whether you're rocking an older iPhone 7, a trusty iPhone 11, the popular iPhone 12, 13, 14, or the latest iPhone 15, and even looking ahead to the anticipated iPhone 16. The core process is remarkably consistent, so let's get you recording in no time!
How to Screen Record on iPhone
Before you can start capturing your screen, you need to make sure the screen recording tool is easily accessible. It lives in your Control Center, but sometimes it needs a little nudge to show up.
Step-by-Step Instructions: How to Enable Screen Recording on iPhone?
Think of this as adding a new superpower to your iPhone's utility belt. Here's how to add screen record on iPhone to your Control Center:
- Open Settings: Tap the grey gear icon on your Home Screen.
- Customize Controls (or Add Controls):
- On older iOS versions, you might see "Customize Controls."
- On newer iOS versions (iOS 14 and later), you'll see "Included Controls" and "More Controls."
Go to Control Center: Scroll down a bit and tap on "Control Center."

- Add Screen Recording: Scroll down to the "More Controls" section. Look for "Screen Recording" (it has a circle-within-a-circle icon). Tap the green plus (+) button next to it.
- This will move "Screen Recording" up to the "Included Controls" list. You can even drag it to reorder where it appears in your Control Center.
And voilà! The screen recording button is now ready for action in your Control Center.
Troubleshooting: Why the screen record button might be missing and how to resolve it.
"Wait a minute," you might say, "I don't see the button even after trying to add it!" or "Where is screen record on iPhone if it's not in Control Center?"
- It wasn't added correctly: The most common reason is simply that it hasn't been added to the Control Center yet. Double-check the steps above. Ensure you tapped the green plus icon next to "Screen Recording."
- Restrictions (Screen Time): Sometimes, content and privacy restrictions can prevent screen recording.
- Go to Settings > Screen Time.
- Tap on Content & Privacy Restrictions.
- Tap on Content Restrictions.
- Scroll down to the "Game Center" section and look for Screen Recording. Make sure it's set to "Allow." If Screen Time is off, this won't be an issue.
Usually, just adding it via Control Center settings does the trick!
How to Screen Record on iPhone Models (iPhone 7, X, 11, 12, 13, 14, 15, 16)
The good news is that the fundamental way how you screen record on iPhone is pretty much identical across all these models once you've enabled the button. The main practical difference is how you access the Control Center.
General Steps for All iPhones
Once the Screen Recording button is in your Control Center:
- Open Control Center:
- For iPhones with a Home button (like iPhone 7, 8, SE 2nd & 3rd gen): Swipe up from the bottom edge of the screen.
- For iPhones with Face ID (like iPhone X, 11, 12, 13, 14, 15, and presumably iPhone 16): Swipe down from the top-right corner of the screen.
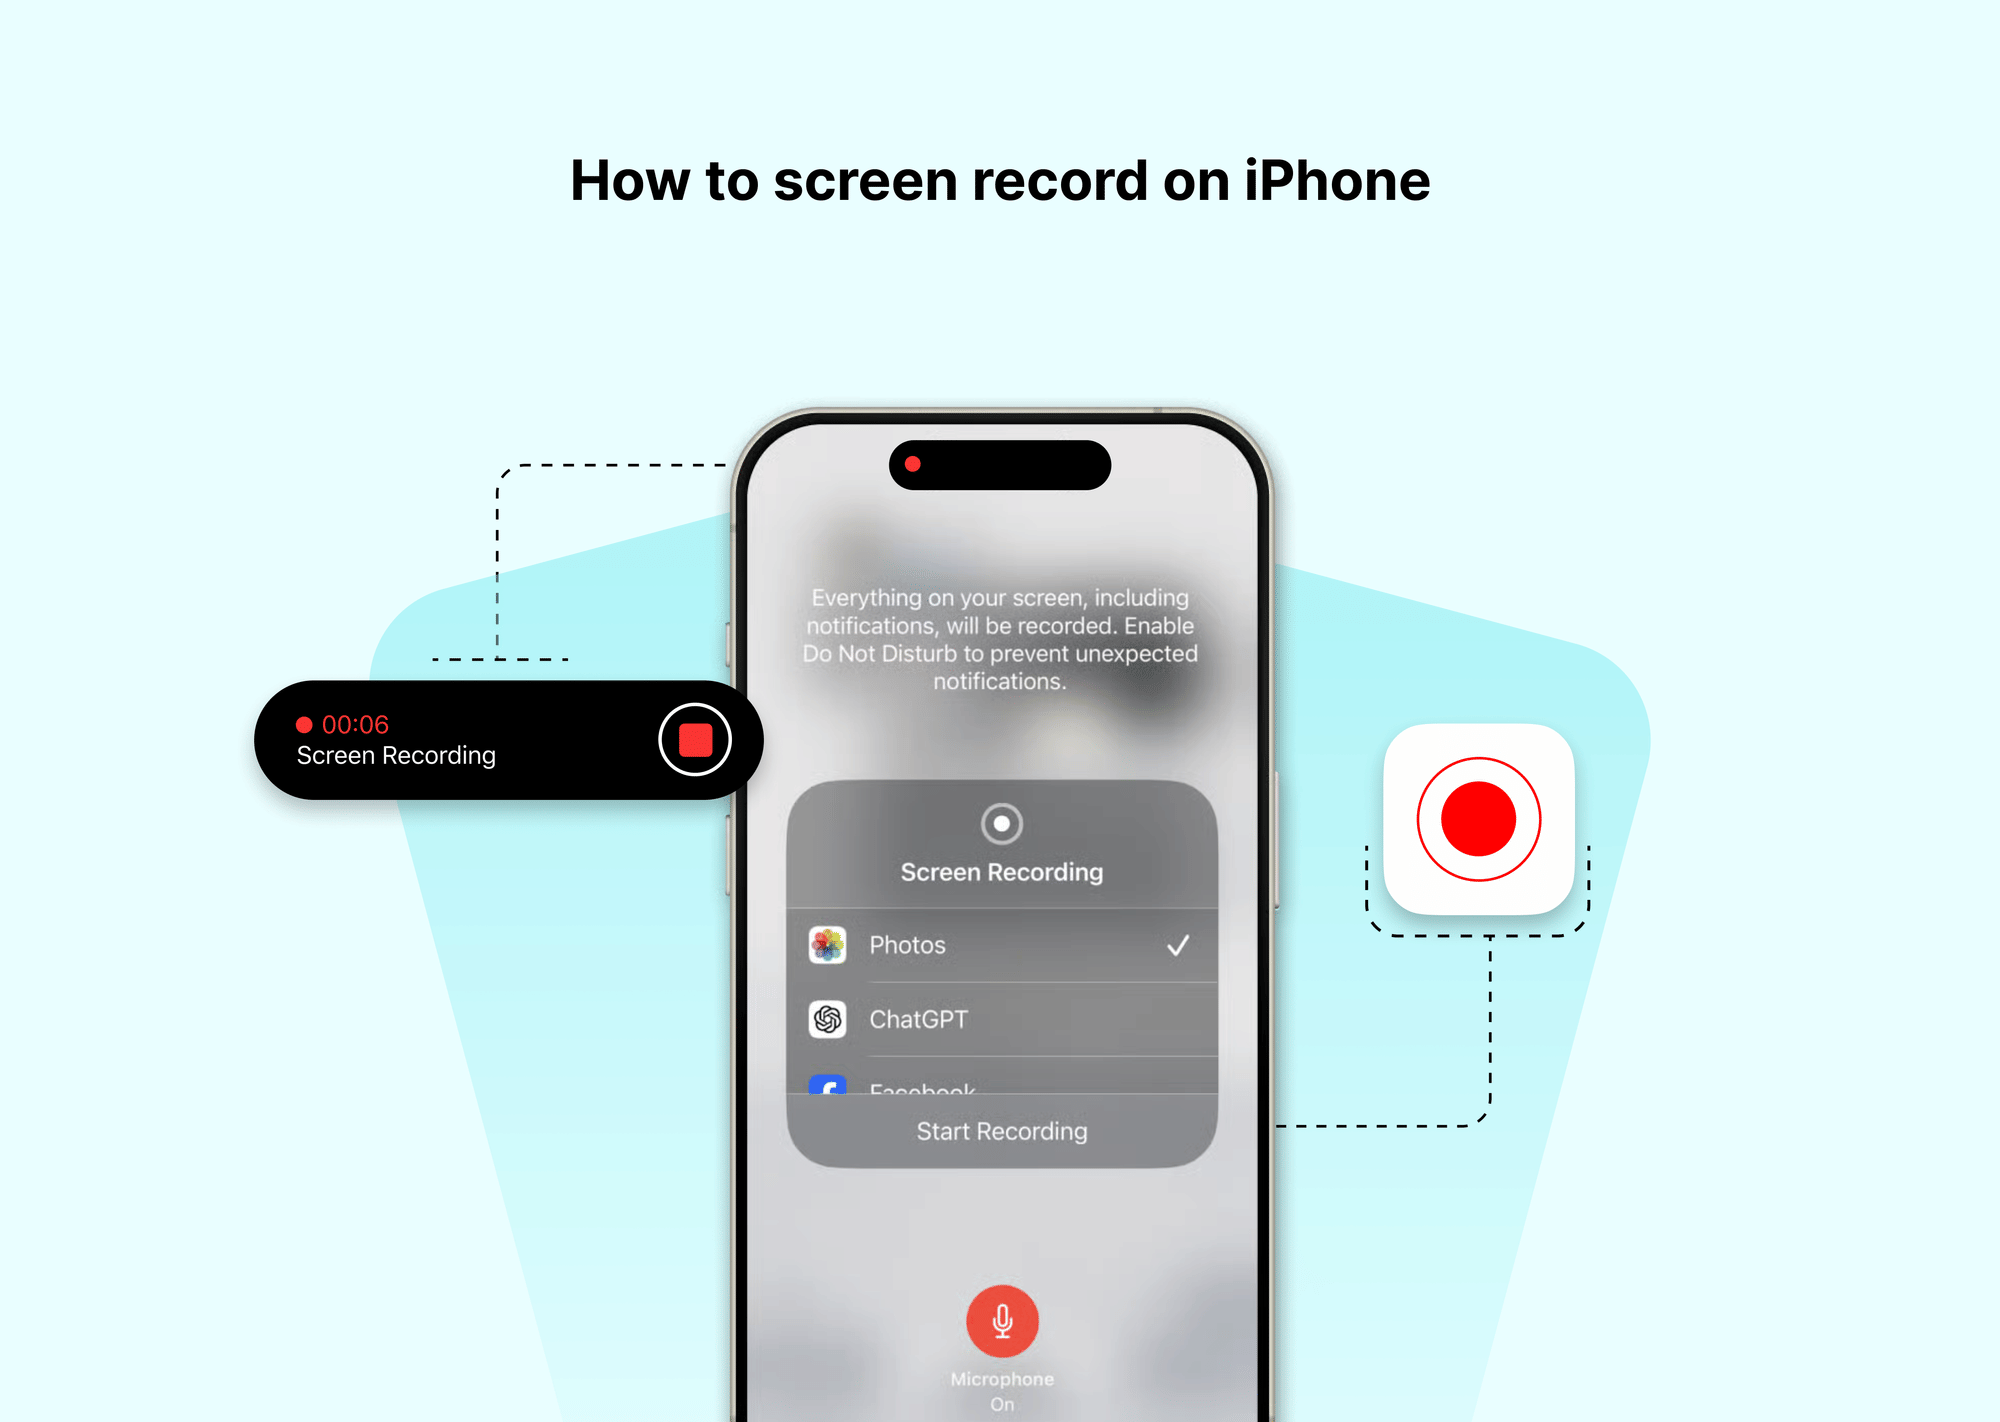
- Tap the Screen Recording Button: It looks like a solid circle inside a thin circle (◎).
- You'll see a 3-second countdown (3...2...1...), giving you time to navigate to the app or screen you want to record.
- Once recording starts, the button in Control Center will turn red, and you'll often see a red status bar at the top of your screen (or a red indicator in the Dynamic Island on newer Pro models).
- Stop Recording: There are a couple of ways:
- Tap the red status bar (or red Dynamic Island indicator) at the top of your screen. A confirmation will pop up; tap "Stop."
- Alternatively, open Control Center again and tap the (now red) Screen Recording button.
Your recording will automatically be saved to your Photos app. Easy peasy!
Model-Specific Instructions
Honestly, there are no significant differences in how screen recording works across iPhone models from iPhone 7 to the (future) iPhone 16. The underlying feature is an iOS staple.
- Key Difference: As mentioned, the only notable change is how you access the Control Center:
- iPhone 7 (and other Home button models): Swipe up from the bottom.
- iPhone X, iPhone 11, iPhone 12, iPhone 13, iPhone 14, iPhone 15 (and likely iPhone 16): Swipe down from the top-right.
- Performance & Quality: Newer models (like the iPhone 14, 15, and certainly the iPhone 16) boast better display quality and more powerful processors. This might result in a smoother recording experience or potentially higher resolution/fidelity in the final video, but the steps to initiate and stop recording remain identical. So, whether you're figuring out how to screen record on iPhone 11, how to screen record on iPhone 13, how to screen record on iPhone 14, or even how to screen record on iPhone 15, the core actions are the same. The same will apply when you want to know how to screen record on iPhone 16.
How to Screen Record with Sound on iPhone
"Okay, I can record my screen, but what about sound?" Great question! By default, screen recording captures the audio playing from your iPhone (like game sounds or video audio). But what if you want to narrate what you're doing? You'll need to turn on your microphone.
Here's how to screen record with sound on iPhone, specifically your microphone audio:
- Open Control Center (swipe up or swipe down, depending on your model).
- Long-press (or 3D Touch on older compatible models) the Screen Recording button (◎). Don't just tap it!
- A new menu will pop up. At the bottom, you'll see a Microphone icon that says "Microphone Off."
- Tap the Microphone icon to toggle it to "Microphone On." It will turn red.
- Now, tap "Start Recording."
Your iPhone will now record both the internal system sounds and whatever your microphone picks up (your voice, ambient sounds, etc.). This is essential for making tutorials or explaining things.
Common Issues and Solutions:
- Recording System Sounds vs. Microphone Sounds:
- Microphone OFF: Records only internal sounds (app audio, music playing on the phone).
- Microphone ON: Records internal sounds AND external sounds picked up by your mic.
- No sound at all?
- Make sure your iPhone's ringer isn't on silent if you expect system sounds (though this usually doesn't affect screen recording audio).
- Check if the app you're recording has its own mute settings.
- If you selected "Microphone On" but only hear system audio, or vice versa, try toggling the microphone option off and on again.
- Want ONLY microphone audio and NO system audio? This is a bit trickier. The screen recording feature typically blends both when the mic is on. The easiest workaround is to ensure your iPhone's volume is turned all the way down before you start recording with the microphone on. This will minimize system sounds in the recording.
Knowing how to screen record with sound on iPhone unlocks a whole new level of utility! This also covers iPhone screen record with audio in general.
Editing Your iPhone Screen Recordings
So, you've made your recording! But maybe it's a bit too long, or you fumbled at the beginning. No worries, basic editing is built right in.
Basic Editing Features in Photos App
Your recordings are saved as videos in the Photos app.
- Open the Photos app.
- Find your screen recording video and tap on it.
- Tap "Edit" in the top-right corner.
- Trimming Videos / Adjusting Video Length:
- You'll see a timeline at the bottom. Drag the yellow handles at the beginning or end of the timeline inward to trim unwanted parts.
- You can play the trimmed version to preview.
- Tap "Done" and then choose to "Save Video" (replaces original) or "Save Video as New Clip" (keeps original and saves edited version).
Using iMovie for More Advanced Edits
For more than just trimming, Apple's free iMovie app is fantastic:
- Adding transitions: Smoothly move between clips (if you combine recordings).
- Adding text: Overlay titles or captions.
- Adding music or voiceovers: Enhance your recording further.
- Picture-in-picture: If you want to get really fancy!
Download iMovie from the App Store if you don't have it already. It's surprisingly powerful for a mobile app.
Third-Party Apps for Editing Screen Recordings
If iMovie feels like overkill or not quite right, the App Store is brimming with great video editing apps:
- InShot: Very popular, user-friendly, lots of features like filters, stickers, speed control.
- Splice: From GoPro, powerful yet intuitive, good for quick edits.
- CapCut: Feature-rich, especially popular for social media videos, offers trending effects and sounds.
Explore these if you need more specialized editing tools for your screen record iPhone videos.
Troubleshooting Screen Recording Issues
Sometimes, things don't go as planned. Let's tackle some common hiccups.
Why Can't I Screen Record on My iPhone?
If you're having trouble, here are a few common culprits:
- Storage Issues: Screen recordings are videos, and videos can take up a lot of space. If your iPhone storage is full, it won't be able to save the recording.
- Fix: Go to Settings > General > iPhone Storage to check your space and free some up if needed.
- Software Limitations (DRM): Some apps, especially streaming services (like Netflix, Prime Video, etc.), block screen recording to prevent copyright infringement. If you try to record them, you'll often get a black screen with audio, or just a black screen. This is by design and not something you can easily bypass.
- Outdated iOS: While rare, an old version of iOS might have bugs.
- Fix: Check for updates in Settings > General > Software Update.
- Restrictions Enabled: As mentioned earlier, Screen Time restrictions might be blocking it.
- Fix: Go to Settings > Screen Time > Content & Privacy Restrictions > Content Restrictions > Screen Recording and set it to "Allow."
- Temporary Glitch: Sometimes, tech just acts up.
- Fix: A simple restart of your iPhone can often resolve minor glitches.
What to Do if Screen Recording is Not Working
If you've checked the above and it's still a no-go:
- Restart Your iPhone: The classic "turn it off and on again" works wonders.
- Check for iOS Updates: Ensure your iPhone is running the latest version of iOS.
- Toggle the Screen Recording Button: Remove it from Control Center (tap the red minus button in Settings > Control Center) and then add it back.
- Reset All Settings (Last Resort): This won't delete your data but will reset system settings to their defaults (Wi-Fi passwords, wallpaper, etc.). Go to Settings > General > Transfer or Reset iPhone > Reset > Reset All Settings. Use this as a last resort as it's a bit of a hassle to set things up again.
Final Thoughts
Screen recording on your iPhone is an incredibly versatile tool. Whether you're creating a quick tutorial for a friend, capturing a bug to report, saving a fleeting moment from a game, or explaining how to screen record on iPhone to someone else, it’s a feature you’ll be glad to know.
Once you've added the button to your Control Center and know how to toggle the microphone, the process is a breeze across all modern iPhone models. So go ahead, start recording, and share your screen with the world (or just your mom!).
FAQs
What is the shortcut to add a screen recorder to an iPhone?
There isn't a direct "shortcut" key, but the quickest way is: Settings > Control Center > scroll to "Screen Recording" > tap the green '+' icon.
What is screen recording on iPhone?
Screen recording on an iPhone is a built-in feature that allows you to capture a video of whatever is happening on your iPhone's screen, optionally including audio from apps or your microphone.
How do I turn on screen recording on iPhone 16?
While the iPhone 16 isn't out yet, it's virtually certain to follow the same method as current models:
- Add the Screen Recording button to Control Center via Settings > Control Center.
- Open Control Center (swipe down from the top-right).
- Tap the Screen Recording button.(This also answers how to screen record on iPhone 16 in general).
How to record FaceTime on iPhone?
You can use the built-in screen recording feature to record a FaceTime call.
- Start your FaceTime call.
- Open Control Center.
- Long-press the Screen Recording button and tap "Microphone On" if you want to record your side of the conversation too.
- Tap "Start Recording."
- Important Note: Always inform the other person(s) on the call that you are recording, as recording conversations without consent can have legal implications depending on your region. This answers how to screen record facetime with sound on iphone as well, just make sure the mic is on!
Why is the screen record button missing on my iPhone?
It's likely not added to your Control Center. Go to Settings > Control Center and tap the green '+' next to "Screen Recording" under "More Controls."
Can I screen record FaceTime calls with sound on my iPhone?
Yes. When you start the screen recording, long-press the record button in Control Center and ensure the "Microphone" option is turned ON. This will capture both the audio from the call and your own voice. Remember to get consent!
Why can’t I screen record on my iPhone?
This could be due to several reasons:
- Low storage space.
- The app you're trying to record (e.g., a streaming service) blocks screen recording due to DRM.
- Screen Time restrictions are enabled for screen recording.
- A temporary software glitch (try restarting your iPhone).
How to screen record on iPhone 11, 12, 13, 14, 15, 16?
The process is identical for all these models:
- Ensure "Screen Recording" is added to Control Center (Settings > Control Center).
- Swipe down from the top-right corner to open Control Center.
- Tap the Screen Recording button (◎).
- (Optional) Long-press the button before tapping to toggle the microphone on/off.
- To stop, tap the red status bar/Dynamic Island indicator or the button in Control Center again.